Przejdź do głównej zawartości
Wersja: 1.0

Configure KSeF Certificates

CompuTec KSeF can use certificates to authenticate with KSeF and support offline invoice processing.

Import the required certificates into the Windows Certificate Store, grant the account used by CompuTec AppEngine access to their private keys, and copy the certificate thumbprints.

You will use the thumbprints later when you configure the CompuTec KSeF Core plugin.

Before you start

Before you configure the certificates:

  • Obtain the required KSeF certificates.
  • Obtain the private key password for each certificate.
  • Make sure you have administrator permissions on the Windows machine where you will install the certificates.
  • Identify the account under which CompuTec AppEngine runs.
Note

This guide uses the Windows Certificate Store in its configuration examples.

Import a KSeF certificate

To import a certificate, follow these steps:

  1. Open Manage computer certificates as an administrator.
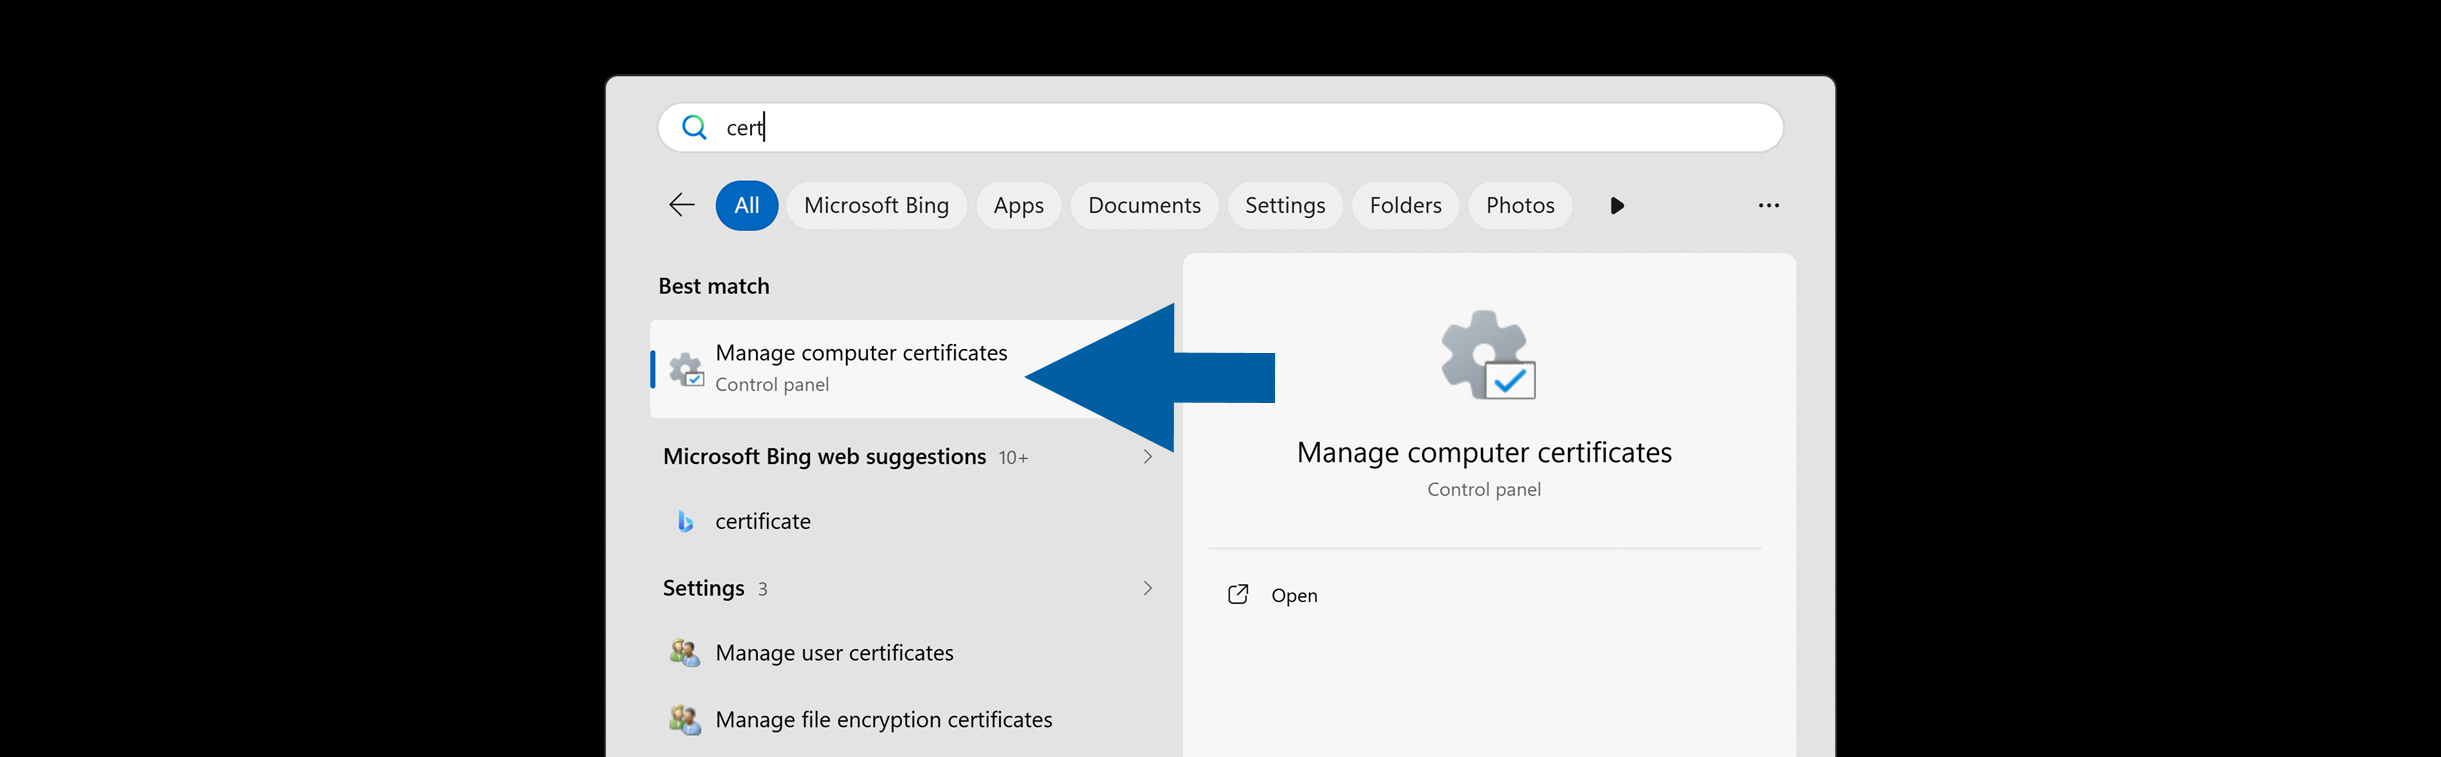
    Windows search results show Manage computer certificates as the best match under Control panel, with a blue arrow pointing to the result. The search field contains cert, and other results include Microsoft Bing web suggestions, Manage user certificates, and Manage file encryption certificates.

  2. Select the certificate store where you want to install the certificate. In our example, we select Personal.

    Certificates management window for the local computer. The left navigation tree lists Personal, Trusted Root Certification Authorities, Enterprise Trust, Intermediate Certification Authorities, Trusted Publishers, Untrusted Certificates, and Third-Party Root Certification Authorities. The main pane is titled Logical Store Name and lists the same certificate stores, with a blue arrow pointing to Personal.

  3. Right-click inside the chosen store and click All Tasks > Import....
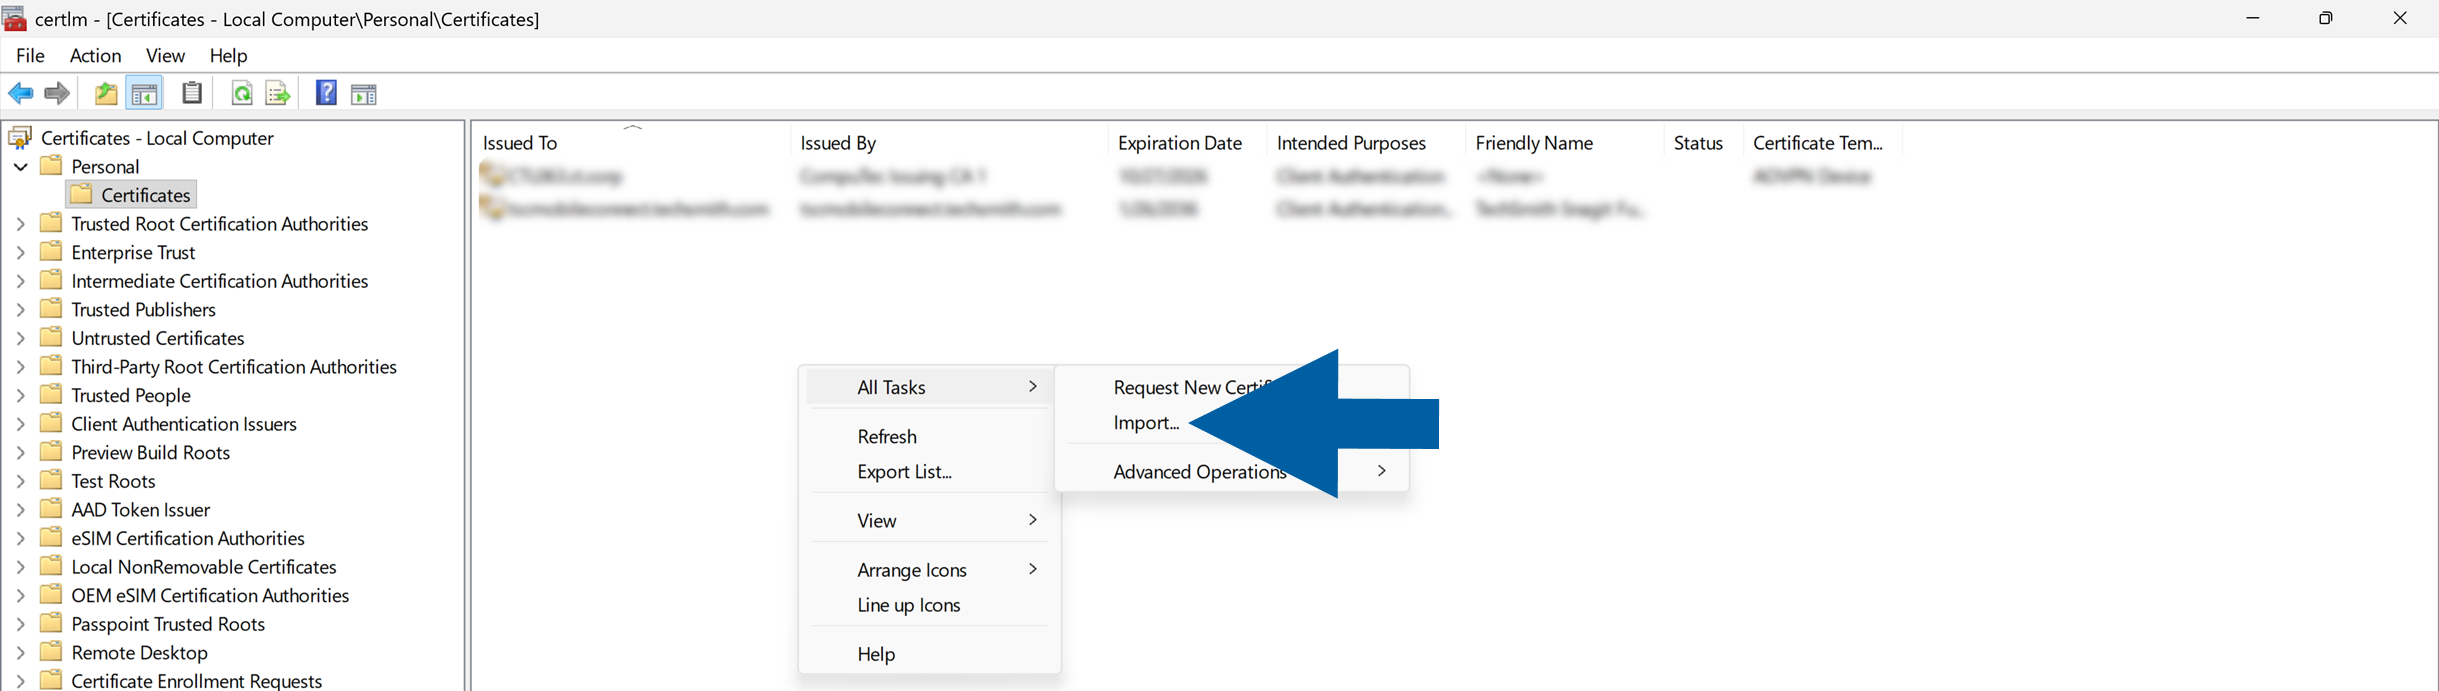
    Certificates management window for the local computer with the Personal\Certificates store selected. A context menu is open in the certificate list, and the All Tasks submenu is expanded to show Request New Certificate, Import..., and Advanced Operations; a blue arrow points to Import....

  4. In the Certificate Import Wizard, click Next.
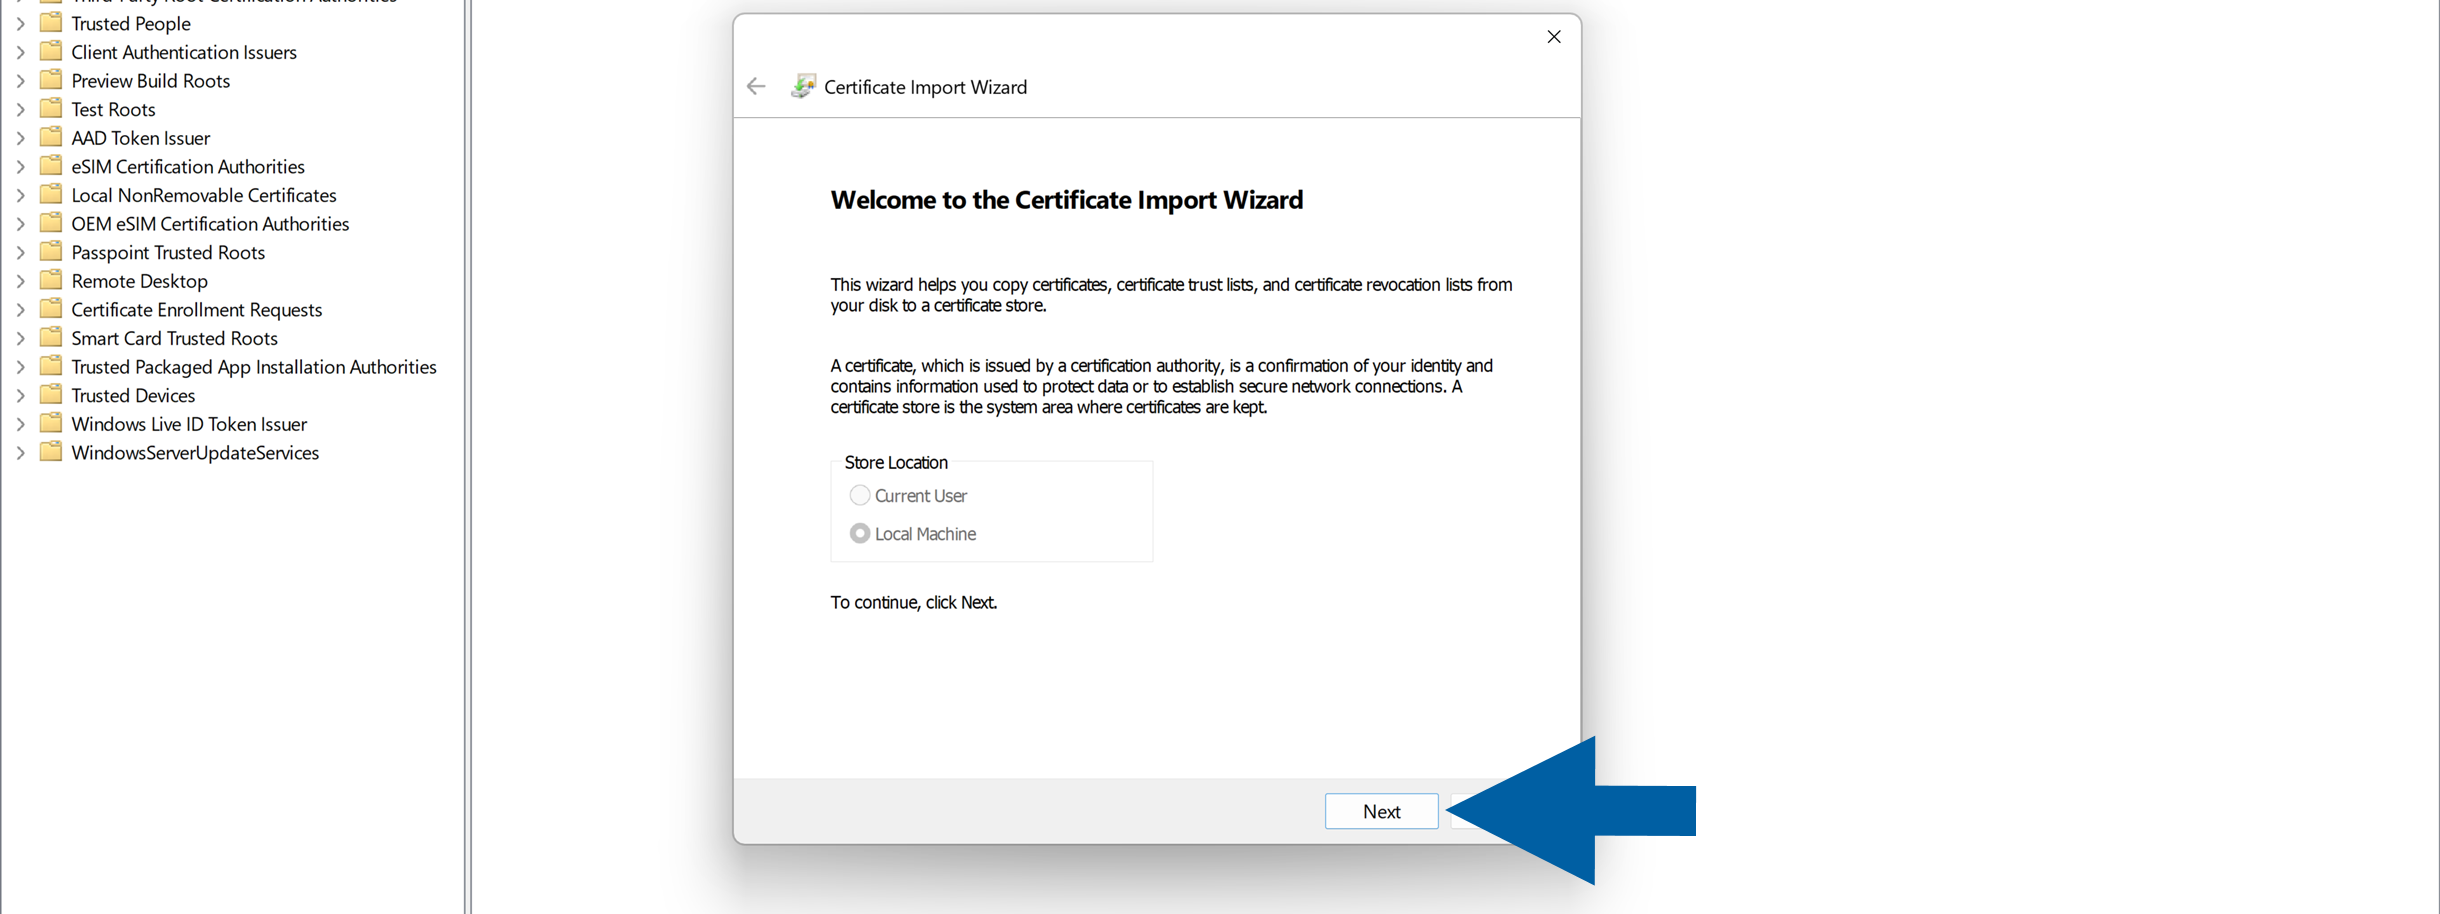
    Certificate Import Wizard welcome screen with Local Machine selected as the store location. The wizard explains that it copies certificates, certificate trust lists, and certificate revocation lists from disk to a certificate store. A blue arrow points to the Next button at the bottom of the calm, instructional dialog.

  5. Click Browse... and select the certificate file you want to import.

    Certificate Import Wizard File to Import page with a File name field and Browse button highlighted by a large blue arrow. The page explains that the wizard can import certificates stored in Personal Information Exchange PKCS number 12 files with PFX or P12 extensions, Cryptographic Message Syntax Standard PKCS number 7 files with P7B extension, and Microsoft Serialized Certificate Store SST files. The Windows certificate management console is visible in the background.

    note

    If your certificate is not displayed, change the file type filter to All Files.
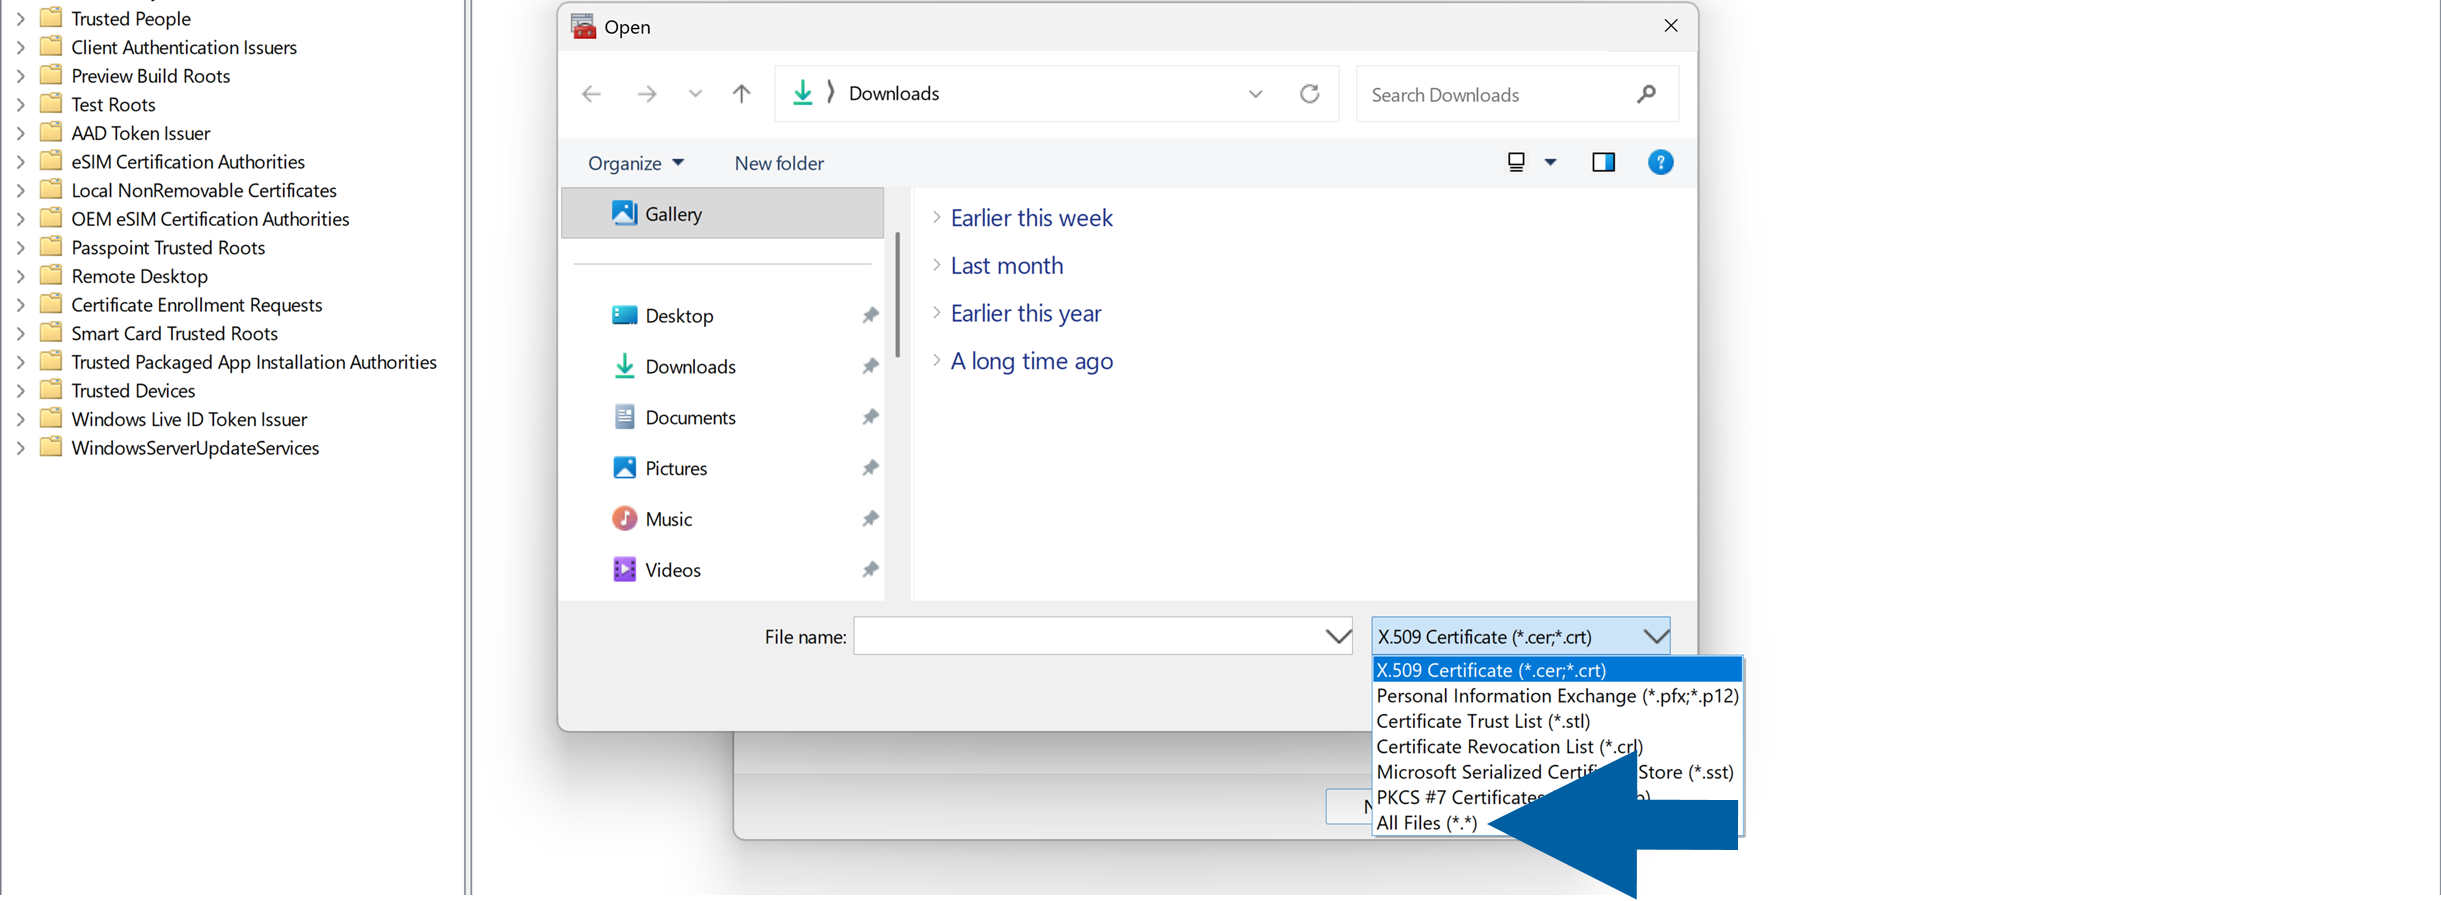
    Windows certificate file picker open to the Downloads folder with the file type menu expanded. The menu lists X.509 Certificate, Personal Information Exchange, Certificate Trust List, Certificate Revocation List, Microsoft Serialized Certificate Store, PKCS number 7 Certificate, and All Files, with All Files highlighted by a large blue arrow. The dialog is calm and instructional, and the certificate management window is visible behind it.

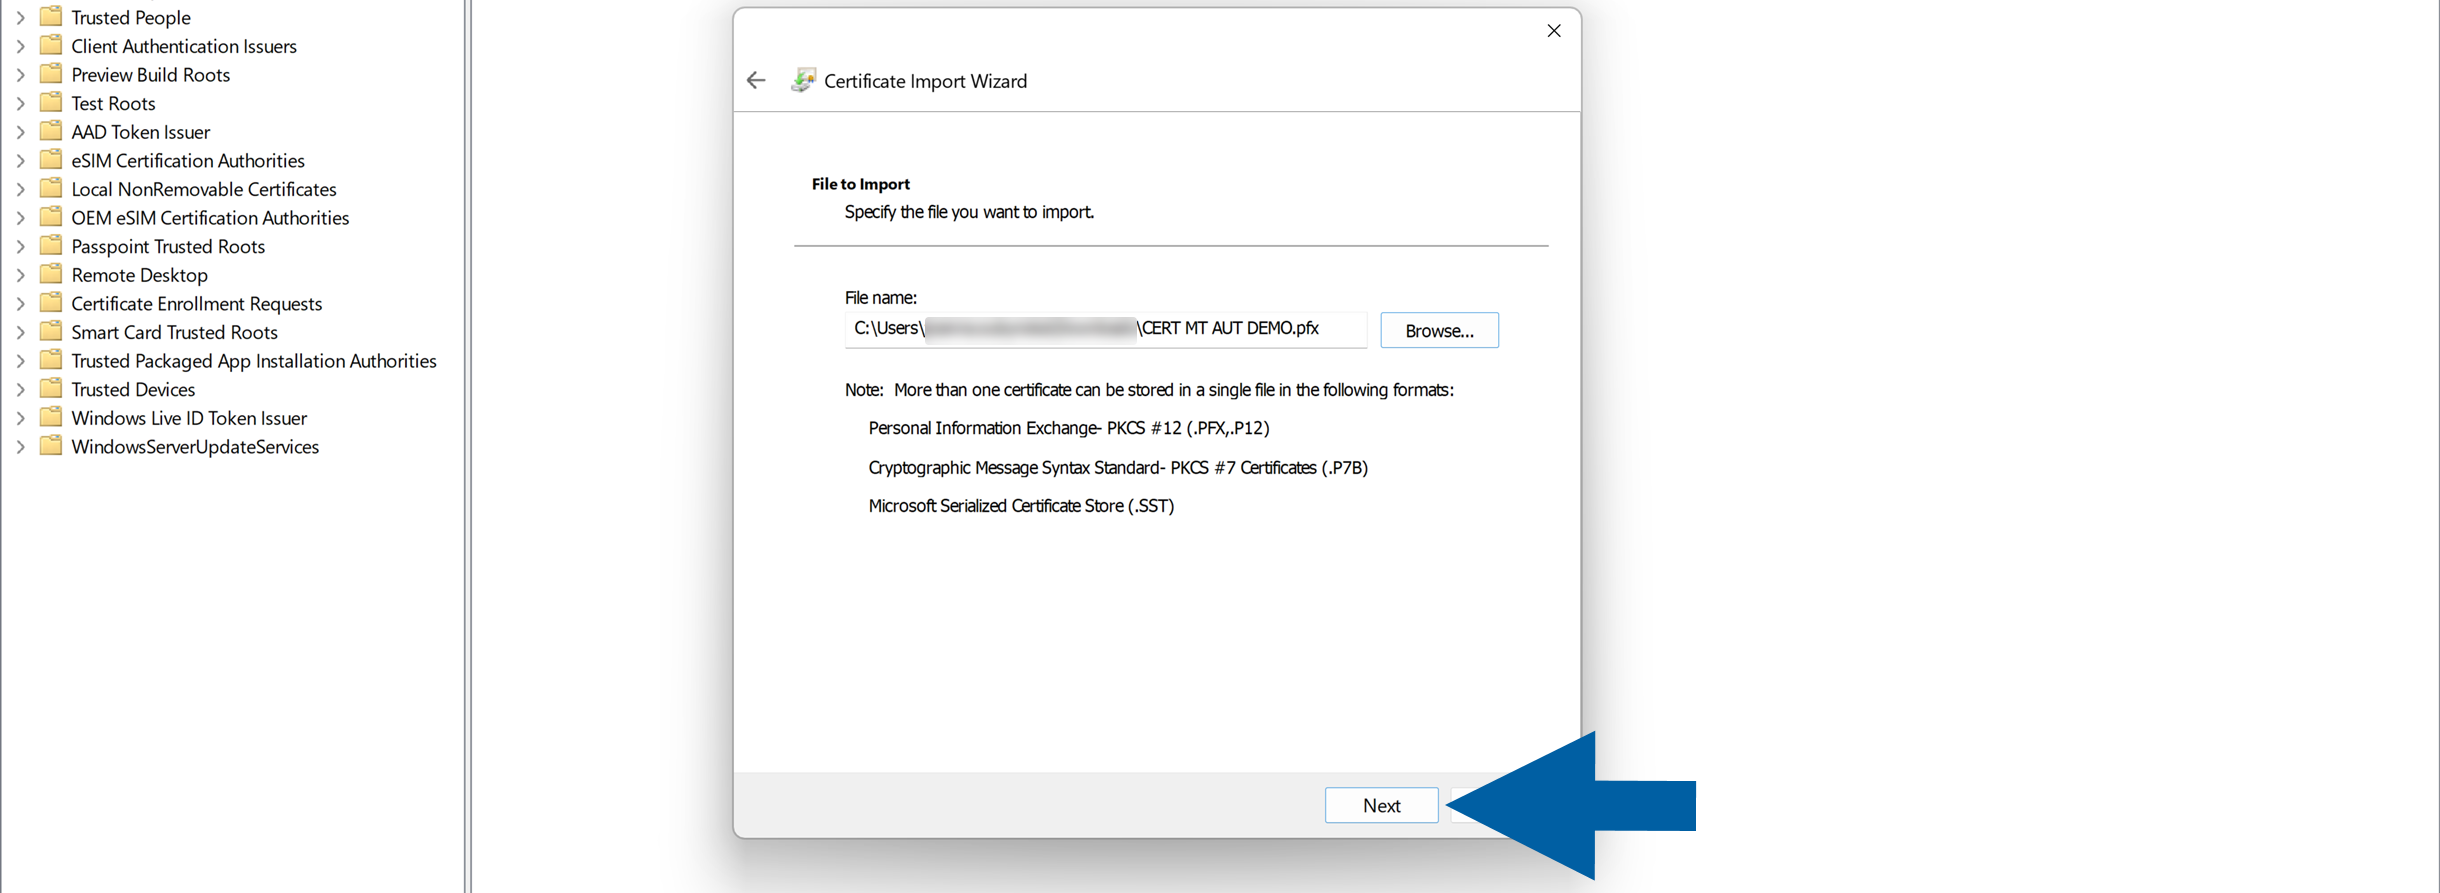
  6. Click Next.

    Certificate Import Wizard File to Import page showing a selected PFX certificate file path, supported formats including Personal Information Exchange PKCS number 12 PFX and P12, Cryptographic Message Syntax Standard PKCS number 7 P7B, and Microsoft Serialized Certificate Store SST, with a blue arrow pointing to the Next button. The Windows certificate management console is visible in the background, creating a clear and instructional setup scene.

  7. Enter the password for the certificate's private key.

  8. Select Mark this key as exportable and make sure Include all extended properties is selected.

    Certificate Import Wizard Private key protection page showing a masked password field, the Mark this key as exportable and Include all extended properties options selected, and the Next and Cancel buttons. A blue arrow highlights the exportable option. The calm instructional dialog appears over the Windows certificate management console.

  9. Click Next.

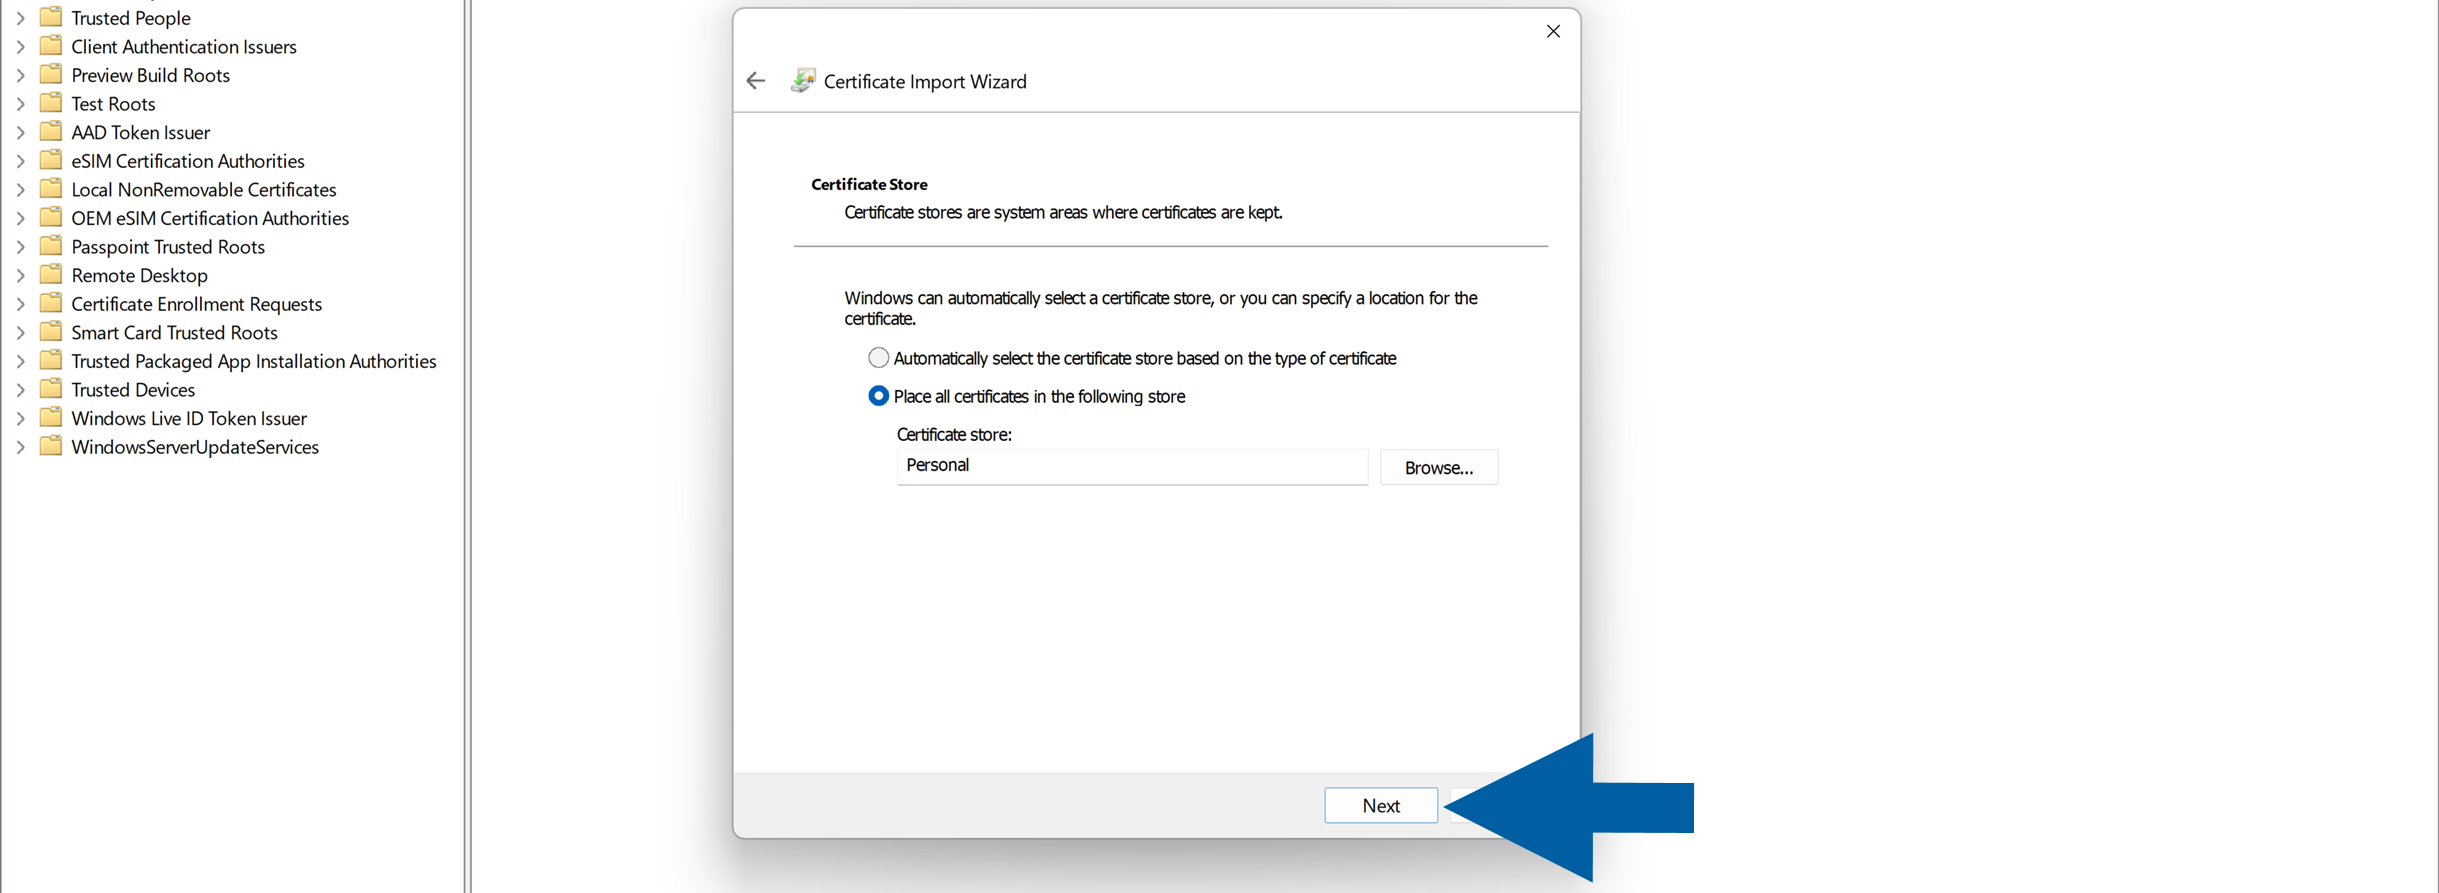
    Certificate Import Wizard Certificate Store page showing Place all certificates in the following store selected, with Personal entered as the certificate store, and a blue arrow pointing to the Next button. The wizard explains that certificate stores are system areas where certificates are kept and that Windows can automatically select a store or let the user specify one. The Windows certificate management console is visible in the background, creating a clear, instructional setup scene.

  10. Make sure the correct certificate store is selected. In our example, this is Personal.

  11. Click Next.

  12. Review the import settings and click Finish.
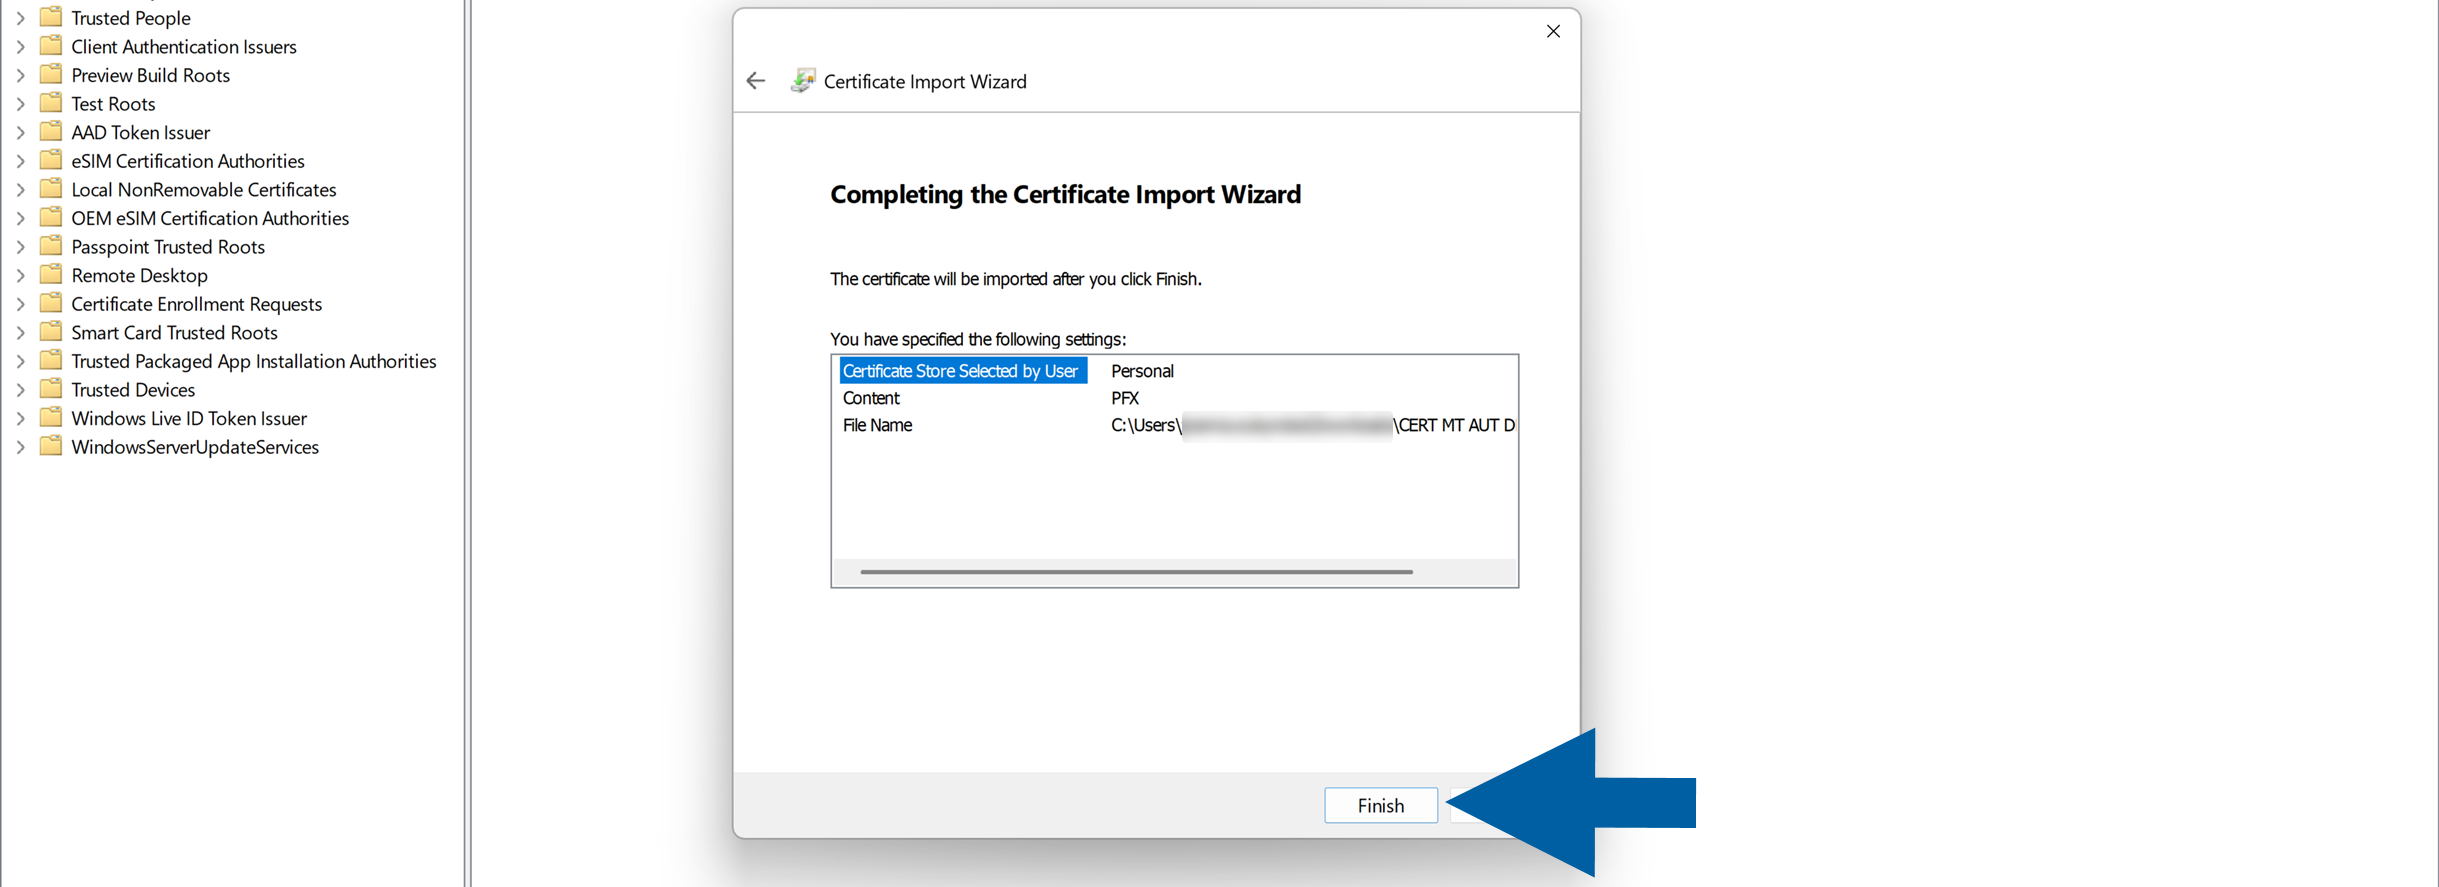
    Certificate Import Wizard Completing the Certificate Import Wizard screen summarizes the selected Personal certificate store, PFX content, and certificate file path, with a Finish button highlighted by a blue arrow. The wizard is open over the Windows certificate management console in a clear, instructional setup environment.

  13. Repeat these steps for each KSeF certificate you need to import.

    Certificate Import Wizard displays the message The import was successful with an OK button. The Windows certificate management console is visible in the background with certificate store entries in the left navigation pane, creating a clear and reassuring confirmation scene.

Grant CompuTec AppEngine access to the private key

After importing the certificates, grant the account used by CompuTec AppEngine access to their private keys.

To set up the permissions, follow these steps:

  1. In Manage computer certificates, right-click the certificate and choose All Tasks > Manage Private Keys....
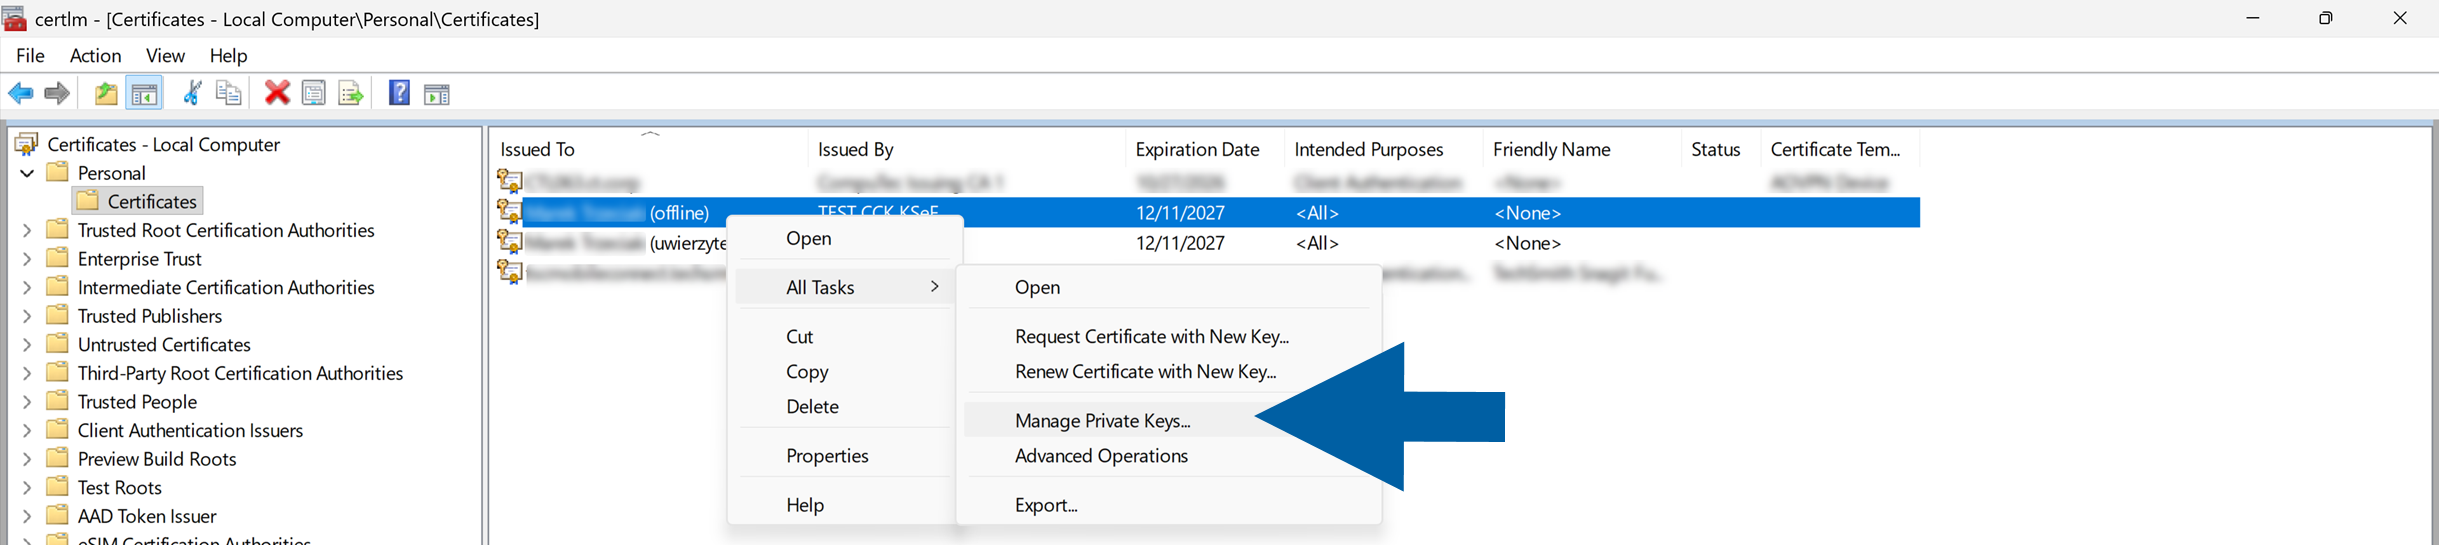
    Windows Certificates console for the local computer shows a certificate selected in Personal\Certificates. The certificate context menu is open with All Tasks expanded, and Manage Private Keys is highlighted by a large blue arrow. The console displays certificate columns including Issued To, Issued By, Expiration Date, Intended Purposes, Friendly Name, Status, and Certificate Template in a clear instructional setup environment.

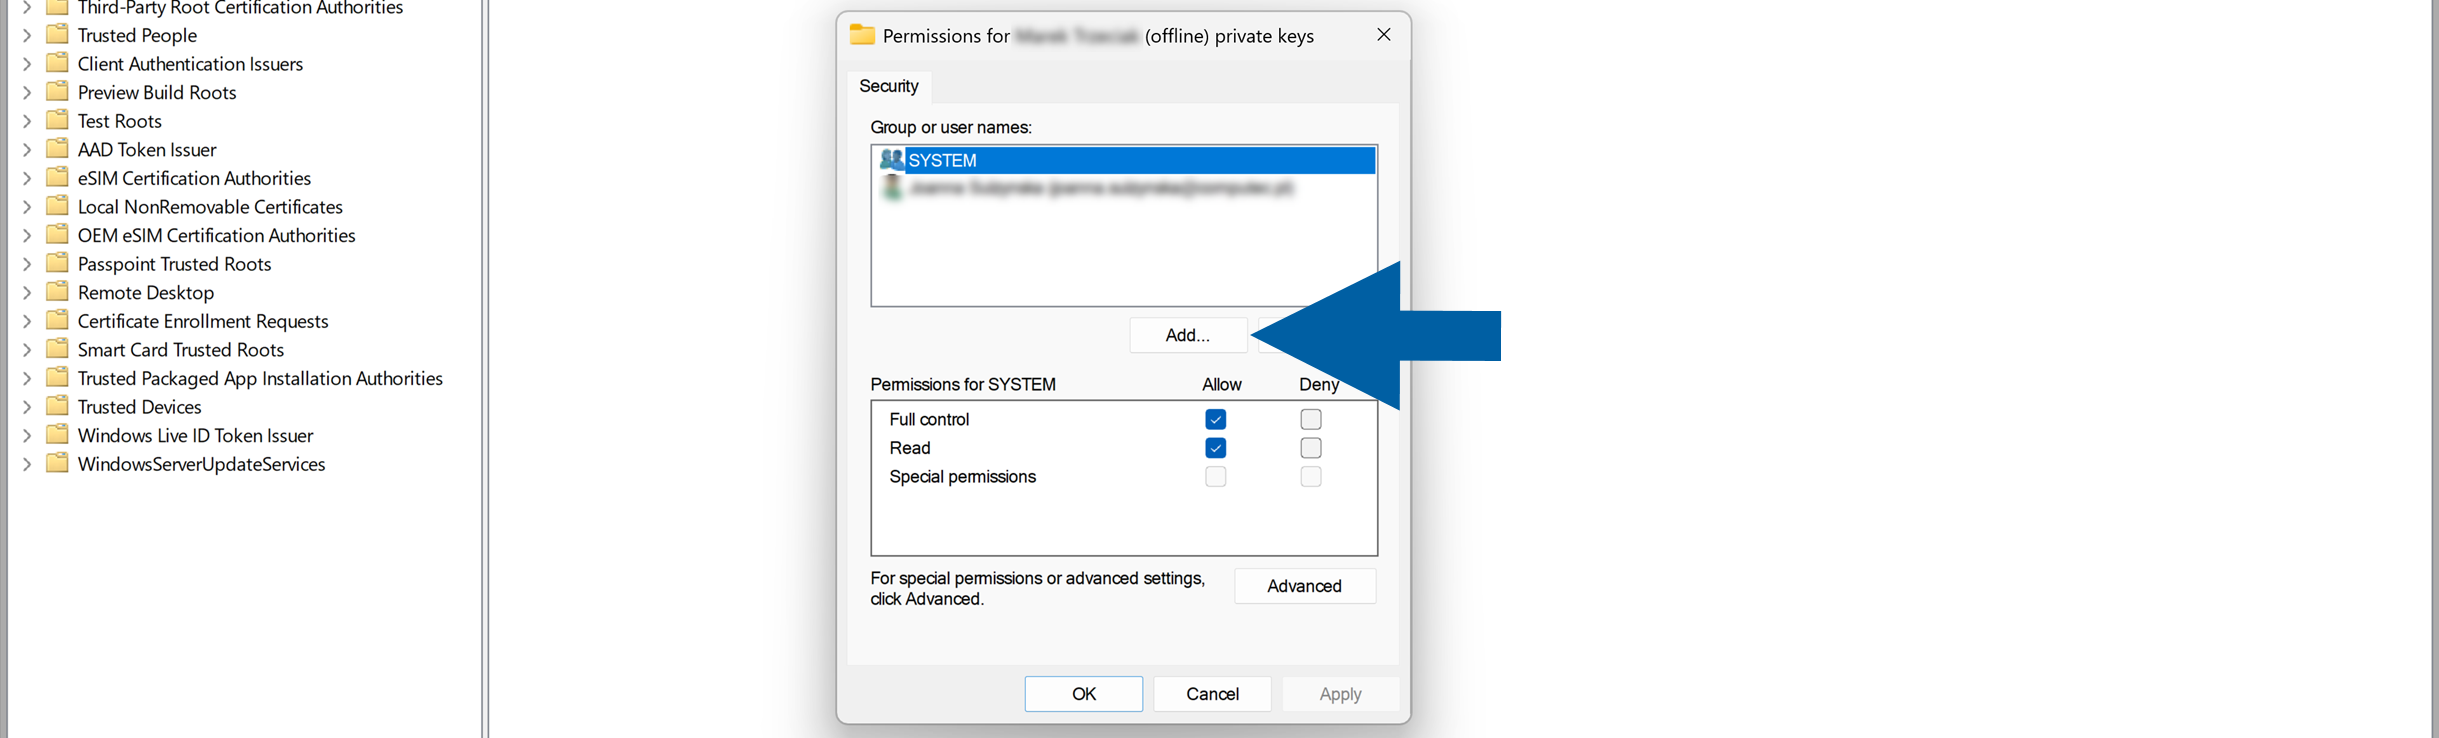
  2. Click Add....

    Windows Permissions dialog for a certificate private key, showing the Group or user names list with SYSTEM selected and an Add button highlighted by a blue arrow. The dialog includes Allow permissions for Full control and Read, plus Advanced, OK, Cancel, and Apply buttons. The Windows certificate store tree is visible in the background, creating a clear instructional setup scene.

  3. Enter the user, computer, service account, or group that requires access to the certificate, and click OK.
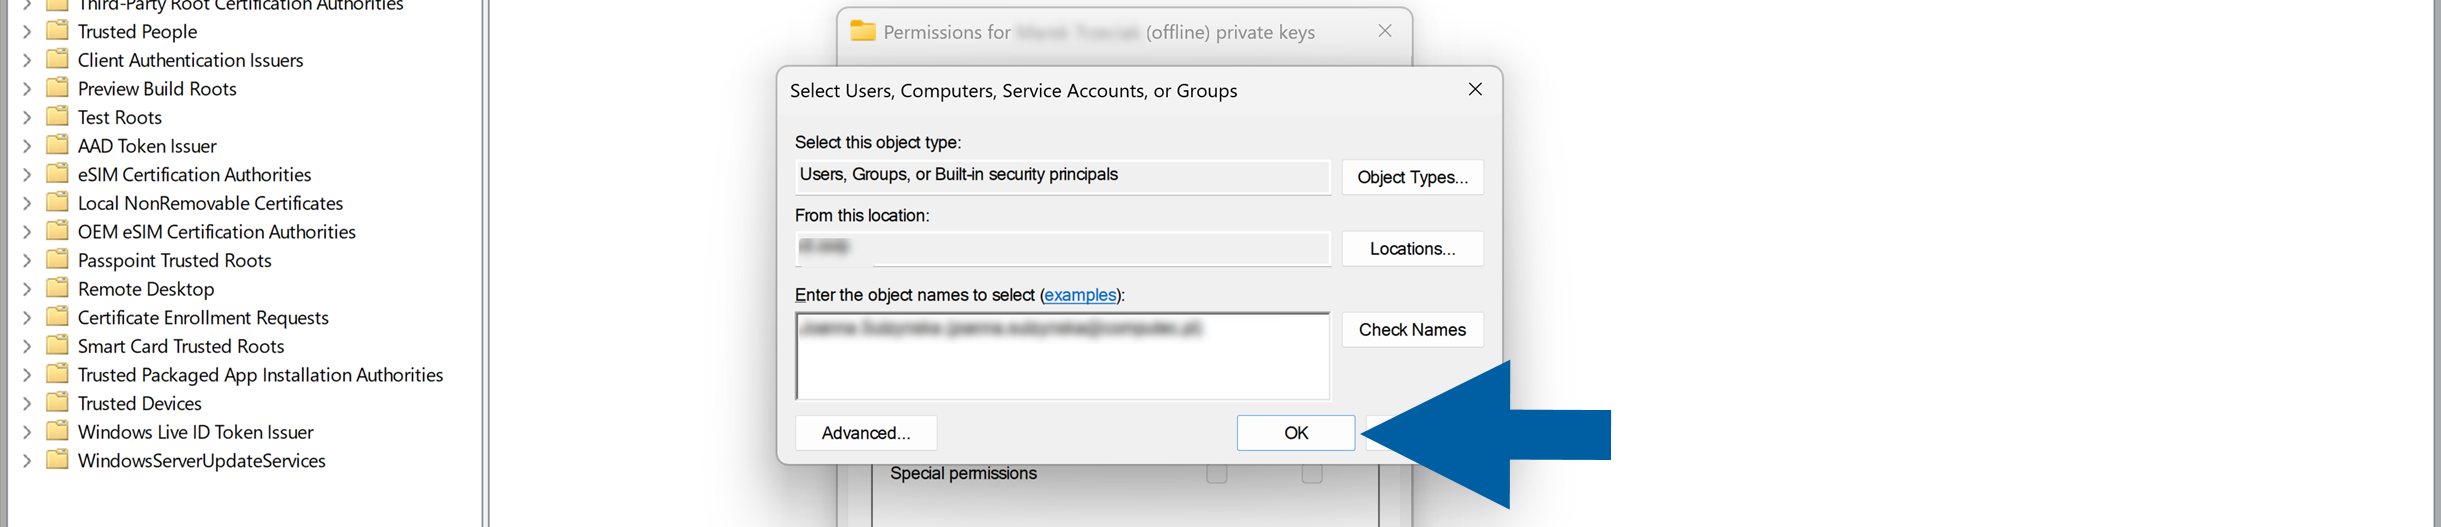
    Select Users, Computers, Service Accounts, or Groups dialog with a user or group entered in the object name field and the OK button highlighted by a blue arrow. The dialog shows the object type Users, Groups, or Built-in security principals, the From this location field, the Check Names button, and the Advanced button. A permissions window for the certificate private keys is visible in the background, creating a clear instructional setup scene.

  4. Make sure the required permissions are granted.

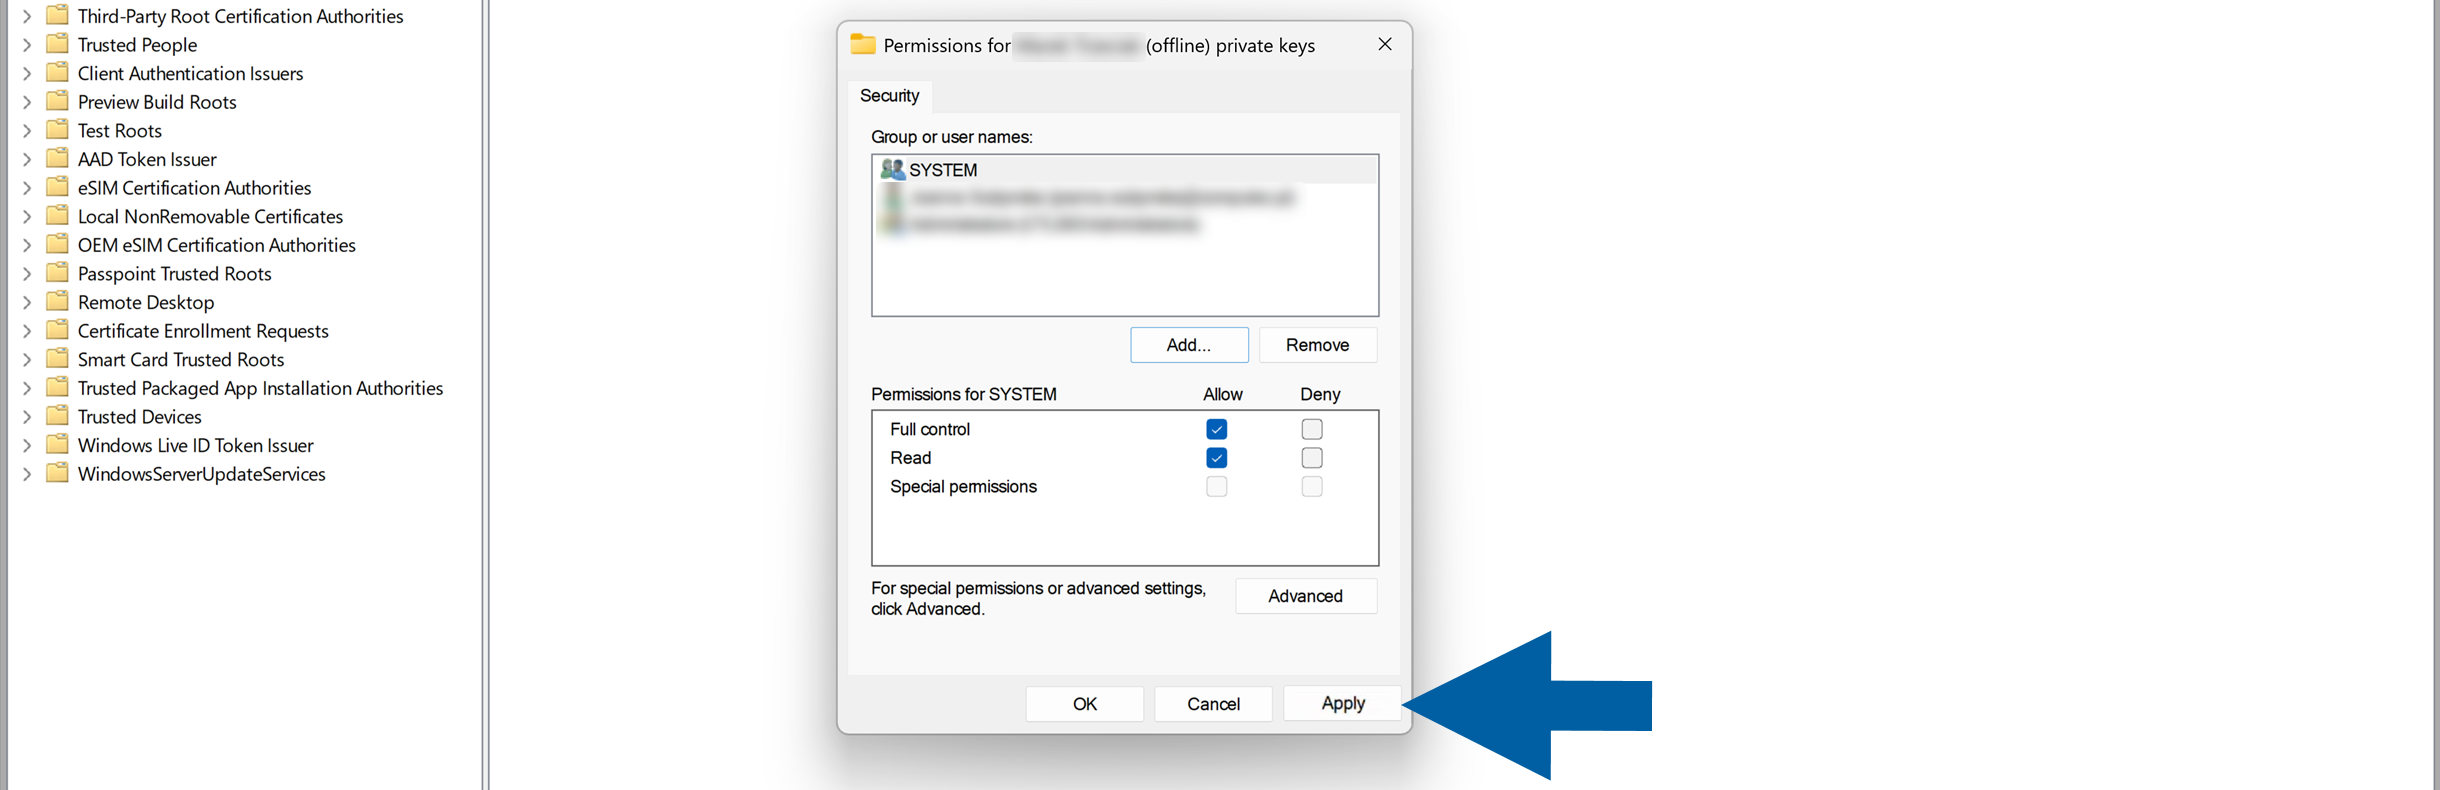
  5. Click Apply, and then click OK.

    Permissions for a certificate private keys dialog on the Security tab. The Group or user names list includes SYSTEM and additional blurred entries. Under Permissions for SYSTEM, Allow is selected for Full control and Read, while Deny is unselected. The dialog has OK, Cancel, Apply, and Advanced buttons, with a blue arrow pointing to Apply. The Windows certificate store tree is visible in the background, creating a clear and instructional setup scene.

  6. Repeat these steps for each KSeF certificate.

    Important

    The account that requires access depends on how CompuTec AppEngine is configured in your environment. Make sure you grant permissions to the account under which CompuTec AppEngine runs.

Copy the certificate thumbprint

Copy the certificate thumbprint so you can use it when you configure certificate authentication in CompuTec KSeF.

To copy the thumbprint, follow these steps:

  1. Double-click the certificate to open it.

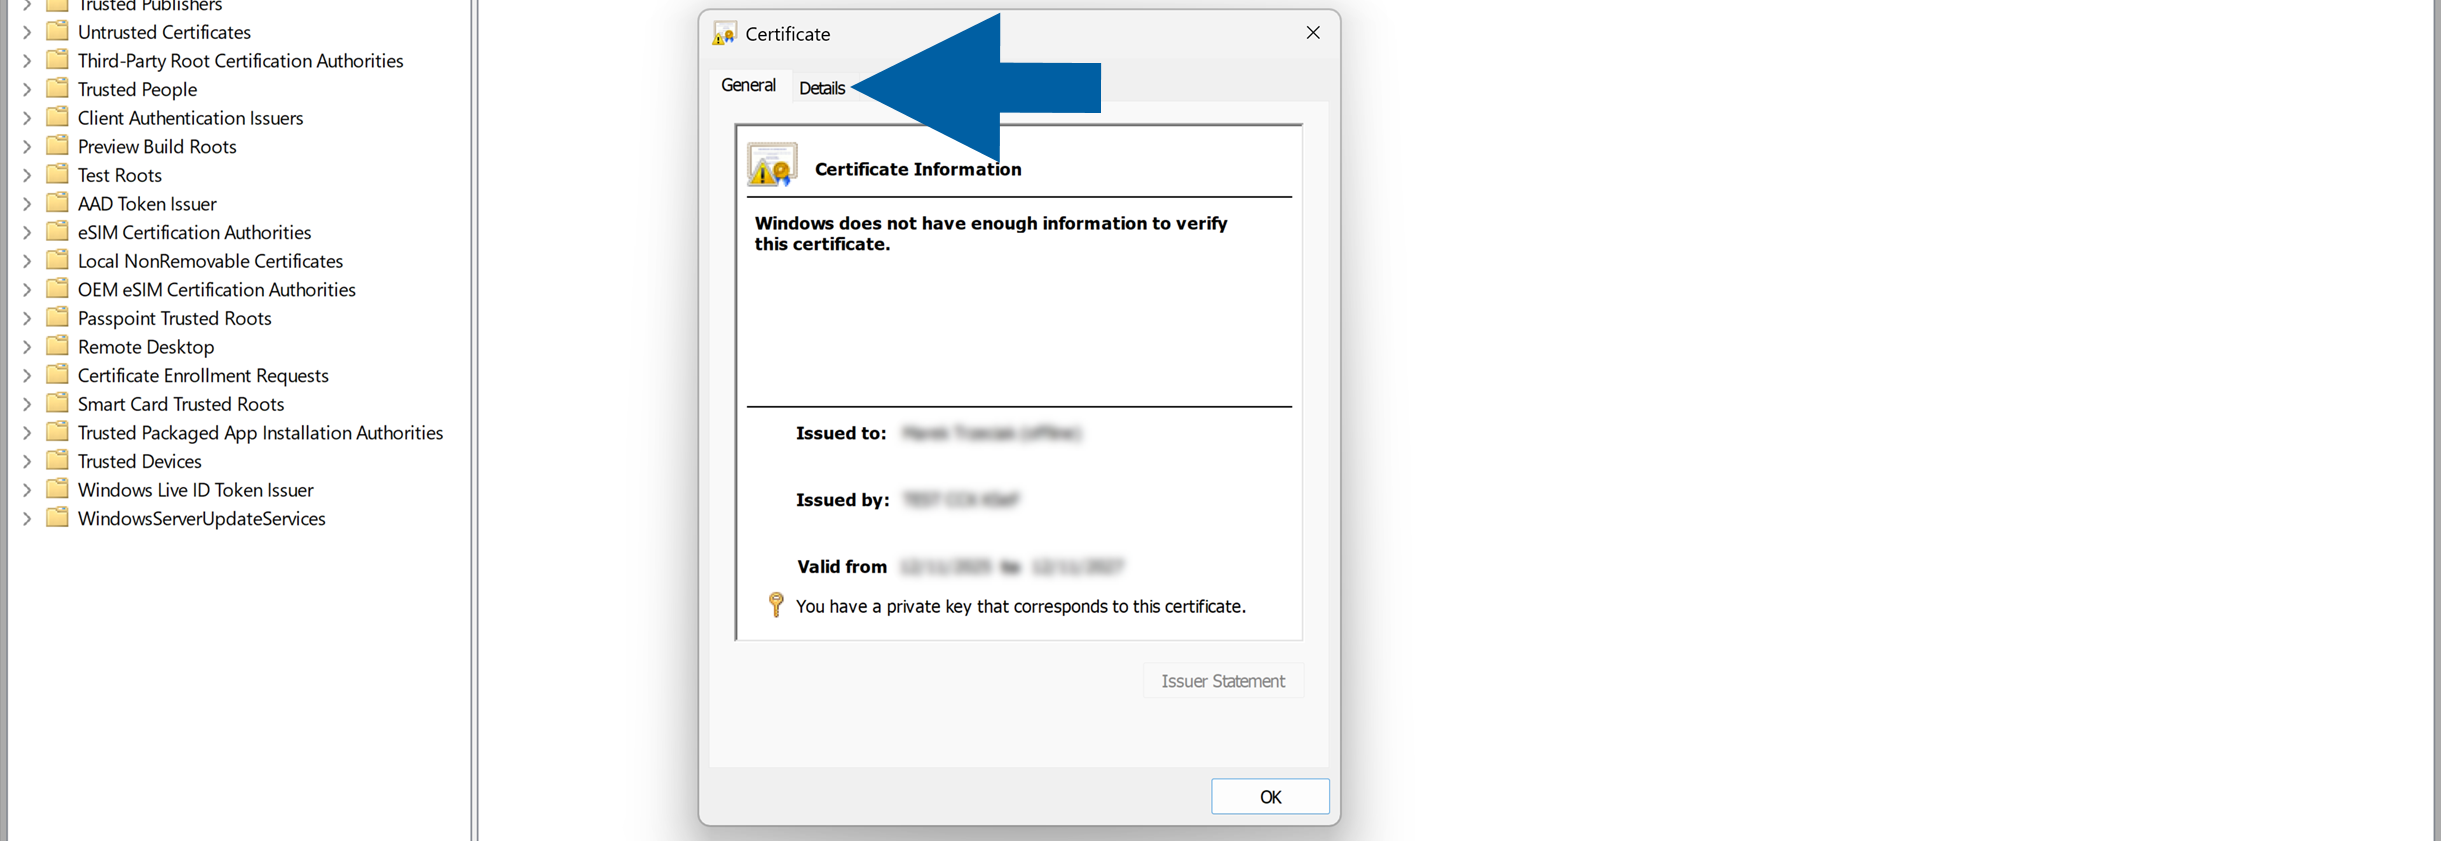
  2. Go to the Details tab.

    Certificate dialog open on the Details tab, highlighted by a large blue arrow. The dialog displays Certificate Information, the message Windows does not have enough information to verify this certificate, certificate issuer and validity details, and a notice that a private key corresponds to the certificate. The Windows certificate store tree is visible in the background, creating a clear instructional setup.

  3. Find and select Thumbprint.

    Certificate dialog on the Details tab with the Thumbprint field selected and its certificate value displayed below; a large blue arrow points to the Thumbprint entry, while the Windows Certificate Store navigation tree is visible in the background.

  4. Select the thumbprint value and press Ctrl+C to copy it.

    Windows Certificate dialog on the Details tab with the Thumbprint field selected and its certificate value highlighted in the lower pane. A large blue arrow points to the selected thumbprint value. The certificate store navigation tree is visible on the left, creating a clear instructional setup.

  5. Convert all letters in the thumbprint to uppercase. For example, you can paste the value into Microsoft Excel and use the =UPPER() function.

    Microsoft Excel workbook showing a certificate thumbprint in cell A1 and the uppercase result in cell A2. The formula bar displays =UPPER(A1), and the Home tab is active in the Excel ribbon. The worksheet provides a calm, instructional example of converting a thumbprint to uppercase.

  6. Save the uppercase thumbprint. You will enter it in CertificateThumbprint when configuring the plugin.

  7. Repeat these steps for each certificate.

Result

The KSeF certificates are installed in the Windows Certificate Store, and the account used by CompuTec AppEngine has access to their private keys.

You also have the certificate thumbprints required to configure authentication and offline processing in CompuTec KSeF.

Additional Information

CompuTec KSeF can use separate certificates for:

  • KSeF authentication.
  • Offline processing and offline QR code generation.
  • Make sure you use the correct certificate thumbprint for each purpose when you configure the CompuTec KSeF Core plugin.

Next steps

After configuring the certificates, configure the CompuTec KSeF Core plugin.

During the configuration, use the certificate thumbprints you copied to configure certificate authentication and, if required, offline processing.

See Configure CompuTec KSeF Core.